Sinatra Portfolio Project
I would like to make a Content Management System for my daughter’s nursery. They keep the daily information about the children in notebooks full of very easy to lose post its and hope this app can help with it. The daily information will be referred to as activities.
The app provides a database and web interface for users to:
* Sign up, log in or log out securely as a nursery staff or parent.
* Nursery staff can create, read, update, and delete (CRUD) an activity.
* Parents can read only the personal profile page of their children.
* User inputs are validated.
I am using Sinatra to build the app, extended with Rake for working with a SQL database using ActiveRecord ORM.
Sinatra is a Domain Specific Language implemented in Ruby that’s used for writing web applications.
My first steps to create the app are:
-Create a repository in Github.
-The project structure following the MVC conventions.
-Set my environment and my config.ru. I am following the Modular Sinatra Pattern and having a config.ru file is one convention of it. The purpose of config.ru is to detail to Rack (Sinatra gem is built on top of Rack) the environment requirements of the application and start the application, mount my application controllers. Rack is a convention, or specification, that lets web applications “plug” into a common interface for handling HTTP requests. To actually serve requests, we need a web server — something that can translate HTTP requests into Ruby calls. My gem ‘thin’ is a web server that do this job.
-Create my Gemfile with all gems that I am going to run trough Bundle, which is set up in my environment file.
Here are the gems I want to use:
Sinatra: to create my web application.
activerecord: it is my Object Relation Mapper, links my Ruby models with rows in my database table. It is a gem to have access to the database mapping and associations.
sinatra-activerecord: it gives me access to some Rake tasks.
rake: short for “ruby make”, it is a package that lets me quickly create files and folders, and automate tasks such as database creation.
require_all: for a simplier way to load code.
sqlite3: sqlite is a library that implements a SQL database engine. sqlite is my database adapter gem.
thin: it is a web server.
shotgun: this is my development server.
pry: my debugger.
bcrypt: it is a hashing algorithm for passwords.
tux: it gives me an interactive console that pre-loads my database and
ActiveRecord Associations.
rake: great gem to create actions and tasks, for example a pry console to test the models and the database. It needs a Rakefile in the root directory of the app with the environment specified and requiring ‘sinatra/activerecord/rake’.
Model classes
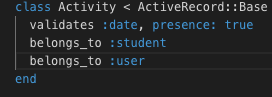
I think that I will need at least 3 models, User, Activity and Student.
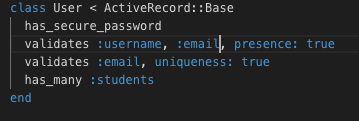
1. User: stores user attributes, including:
* Username
* Email
* Password (Secured with Bcrypt hashing algorithm)
* Nursery_staff, a boolean value to indicate if a user is a nursery staff
2. Activity: stores activity attributes, including:
* Date
* User_id, to associate Activity to User
* Student_id, to associate Activity to Student
* Breakfast
* Morning Snacks
* Lunch
* Afternoon Snacks
* Sleep
* Nappies
* Comments
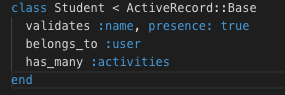
3. Student: stores student attributes, including:
* Name
* User_id, to associate Student to User
* Key person
* Room
Model Associations
User has many students and has many activities
Student has many activities and belongs to a User (parent).
Activity belongs to a Student and belongs to User.
Is it works?
I am using Visual Studio Code and after creating the structure of my project with very basic info I tried to run shotgun and was getting the following error:
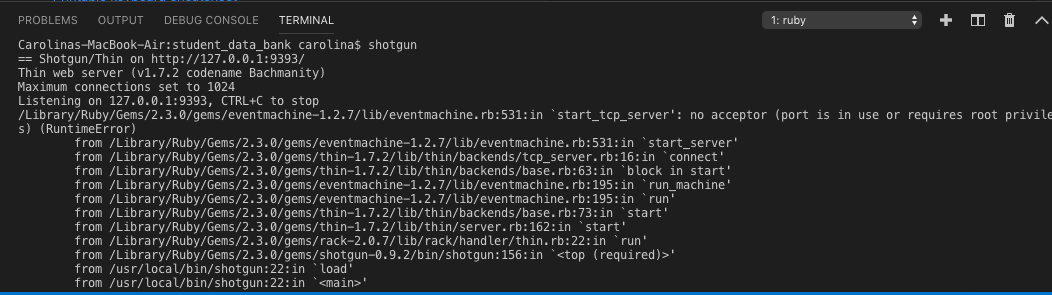
I had a server running in the background. After trying a lot of different things I could stopped it with the following I found in StackOverflow:

Ran lsof -i :9393 (9393 is the port I ran it on).
I killed the process using kill -9 *pid*. My pid was: 58152.
When I ran lsof -i :9393 again, nothing showed up.
I then ran shotgun and everything works fine now.
Model Validations
You can find all info about validations here.
I will use in my controllers the methods save and update, which trigger validations for themselves and will save the object to the database only if the object is valid.
I will use some helpers to validate that some specified attributes are not empty. I want to make sure that a user gives an username and an email and that an activity has a date and a student has a name at least. I will validate the uniqueness of the email too.
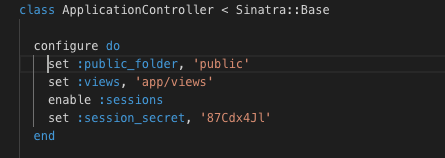
Authentication system
Enable sessions in your AppController and use the gem bcrypt. Make sure your user model has_secure_password and that on your users table you store the password like “password_digest“.
Protecting the session secret by Martin Fowler:
I changed my configuration to look like this:
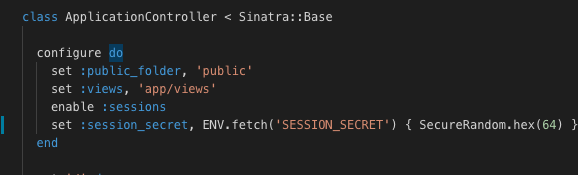
The password fails safe to a secure hex value if SESSION_SECRET is unset.
Database
Create a Database folder (db), run your migrations to create your tables. I have created one table for the students, another table for my users and a last one for the activities.
I run:
rake db:create_migration NAME=create_students
rake db:create_migration NAME=create_users
rake db:create_migration NAME=create_activities
Then modify my migration tables according to my needs.
And finally run rake db:migrate, and all your tables will be added.
Play with my models and the database.
I run tux in my console but I got the following error
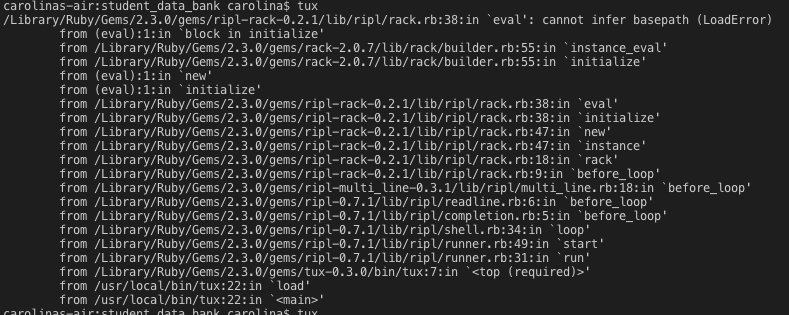
config.ru does not support require_relative so I changed my link and everything works fine!
Now it is time to be more creative and design my routes in the controllers and my views. I am using Bootstrap.
To check this project follow the link.
Local web server and Visual Studio Code
I am using Visual Studio Code to follow the HTML fundamentals lessons of Flatiron Bootcamp.
In order to get a running local web server to see my code in action I chose to use the following procedure which is valid for MAC or PC and I saw in this website: Visual Studio Code and local web server.
- Create folder for your project and add an index.html file and a package.json file to it. Inside package.json file copy/paste the following text:
|
1 2 3 4 5 6 7 8 9 10 11 12 13 14 |
{ "name": "Demo", "version": "1.0.0", "description": "demo project.", "scripts": { "lite": "lite-server --port 10001", "start": "npm run lite" }, "author": "", "license": "ISC", "devDependencies": { "lite-server": "^1.3.1" } } |
I tried that but it didn’t work, I was getting an error (to see more about it check this link) :
String does not match the pattern of "^(?:@[a-z0-9-~][a-z0-9-._~]*/)?[a-z0-9-~][a-z0-9-._~]*$".
So I changed the string ‘Demo’ to ‘demo’ and all good.
- Install Node.js and npm. I follow this website: Installing Node.js and NPM on Mac.
- First, install Homebrew running on your terminal:
ruby -e "$(curl -fsSL https://raw.githubusercontent.com/Homebrew/install/master/install)"
-
- Get the latest version of Node running:
brew update
-
- Install node running:
brew install node
-
- Test that you got Node running:
node -v
-
- Test that you got NPM running:
npm -v
- Install the web server running:
npm install
This will install lite-server (defined in package.json), a static server that loads index.html in your default browser and auto refreshes it when application files change.
- Start the local web server running:
npm start
Done!!
CLI Project Review day
Today is my CLI project review and I reserved my day to review for the last time my code and check that everything is working in my interface.
As soon as I opened the web page that I am scraping I noticed that they have changed their content. Glup! I checked to see if my code was still working….and…not, that new exhibition was not included in my list of exhibitions.
PANIC! I am nervous because is my first project review and I really don’t know how is going to be. And now I found that some exhibitions were not included and… Oh! Wait, I found out that that web page has links to more pages. I should scrape those pages too to get a full list of the exhibitions and I don’t have much time.
I started to make all the changes to get everything working well. I was inspecting the page but I din’t see why my CSS selector was not working. It seems that only the recommended exhibitions are listed, when I wanted all of them. I tried like 20 different selectors and I can not get that new exhibition! I struggle with CSS selectors… I find them very difficult!
After 4 hours and with a mental speech to explain why my code is not working properly and I didn’t do anything to fix it I found out that I was looking to a different web page. I was looking to the archive page and not to the “whats on” page, the one I wanted…
OK, everything is fine after all!
But I want to share this experience. I have learnt a few new things like how to get attribute info with a CSS selector in a Nokogiri document.

And finally I have learnt another important lesson like, when you are nervous and you don’t have much time left, don’t change your code. Don’t break everything in the last minute like I did. Keep calm and later explain what you have found and try to fix it, but not in a rush. Go for a walk, breath some fresh air and take it easy. Chocolate cookies help too.
Artify walkthrough
Programming my classes
After all the previous steps now I have pretty clear how I am going to structure my code.
I want a CLI that displays art exhibitions and gives to the user more info about the one it chooses. I am going to scrape from a public website all the info concerning the art events (Artlyst).
I want three classes: a CLI, an exhibition one and a scraper.
This three classes will live inside a lib folder.
I finally changed the CLI class name for artify in case I want to publish my gem in RubyGems.org. So I have threes classes: artify, exhibition and scraper.
Let’s start coding!
To check my code go to my Github repository.
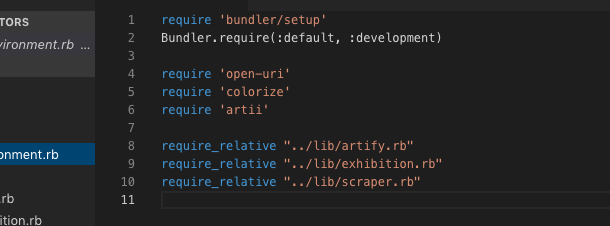
After programming my classes I require them inside the environment.rb file.
And that’s it!
If you want to play with this gem please check this link: readme page.
Hope it was helpful!
The executable file
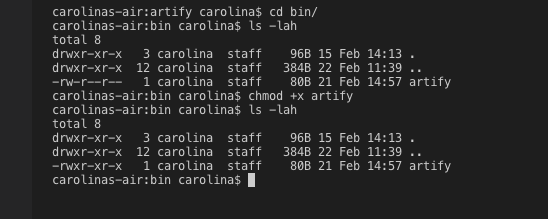
I create a folder bin and create inside of this folder an executable file called in this case as the gem, ‘artify’.
When I type: $ruby bin/artify, everything run but I don’t want this. I want that the user from the bash can type: $ ./bin/artify.
So I type:
$ cd bin/
$ ls -lah
Ad I can see that artify doesn’t have executable permissions. To change this I type:
$ chmod +x artify
$ ls -lah
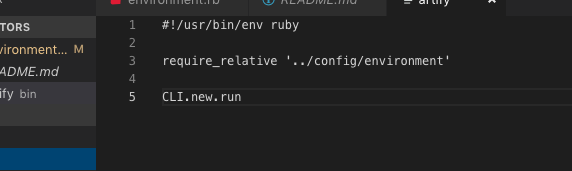
This executable file is not a ruby file so I have to include at the top the following:
#!/usr/bin/env ruby
Then I require our environment file to use all the gems already installed.

In this file I want to run for my still imaginary CLI class. I want to write here something like: CLI.new.run.
So, at this point, I know I want a class CLI, where I am going to build all the methods and keep all data to run my CLI.
I finally changed this name for ‘artify’ in case I want to publish it in RubyGems.org.

How to build a CLI Ruby Gem
Steps followed:
- Planning my gem.
I would like to build a command line interface gem where I can check art exhibitions and get more info about the ones I liked.
How it would work:
– User types “exhibitions”.
– And ‘Artify’ will show a list of exhibitions like this:
Exhibition title – where
dates
-Which exhibition do you want to learn more about?
-And it will display more info about the exhibition selected.
- Setting up the environment and the correct structure for a CLI ruby gem.
- Creating the executable file and starting to make things real.
- Programming my classes.
Walkthrough video
Artify Environment
Setting my own environment: Visual Studio Code, Git and Bundler
First, I create a repository in Github.
Then, I create a new folder in my laptop where I want to clone the repository.
I open this folder in my VS code and open the terminal (ctrl + `).
I run: git clone + the https from the repository.
When I make changes:
First, I stage this changes.
Second, I write commit message and commit.
Third, I push my changes.
Installing Bundler
First I make sure I have the latest version of RubyGems. I run in the VS code terminal $gem update –system
Then I instal Bundler: gem install bundler but I got an error message
I don’t have write permissions. I googled this error output and I am trying something I found in stack overflow: sudo gem install bundler. I gave the personal password for my computer and it worked!
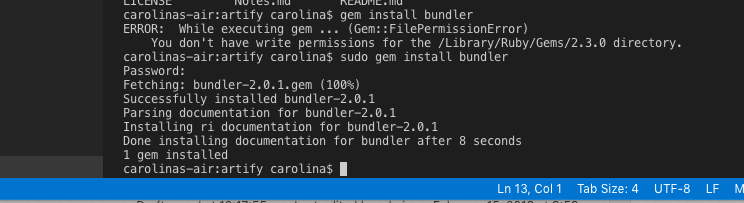
The purpose of sudo is to execute the command given to it with root privileges.
Adding Gems to gemfile
I created a new file gemfile and I am adding my gems to it, bundler.

‘~> 2.0’
~> is called “Twiddle-Wakka.” '~> 2.0' means any minor version above 2.0, 2.1, 2.2, 2.3 … and 2.9 included would work (including patches); but version 3.0 wouldn’t work because it indicates a new major version.
The second specification '>= 2.0.1'means any version greater than or equal to 2.0.1. Both specifications have to be true, so this gem couldn’t use version 2.0because it’s lower than 2.0.1.
My Gemfile.lock file
I run in the VS code terminal $bundle install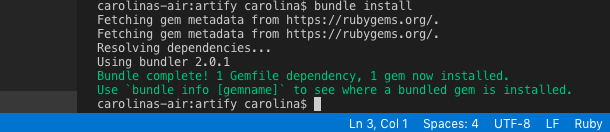 Automatically a file was created in my directory: Gemfile.lock
Reviewing my installed gems
I run in the VS code terminal $gem list
Checking where my Bundler is
I run in the VS code terminal $bundle show [bundler]

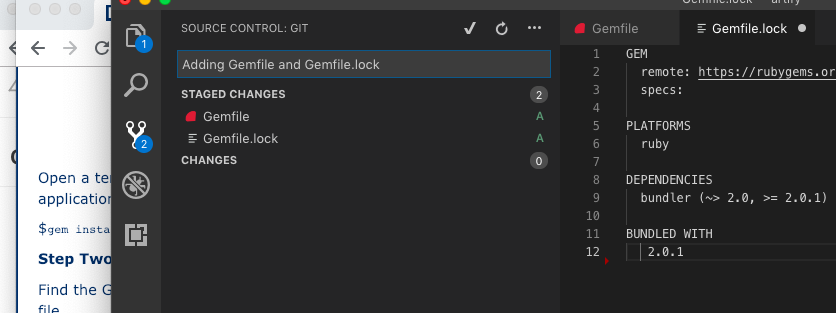
Adding Gemfile and Gemfile.lock to my repository
I run in the VS code terminal $git add Gemfile Gemfile.lock.
I could staged the changes in my VS code, they do the same thing that the git add command.
I check my Github repository….and it didn’t work.
Ok! I forgot to push my changes, so I ran: $git push origin master
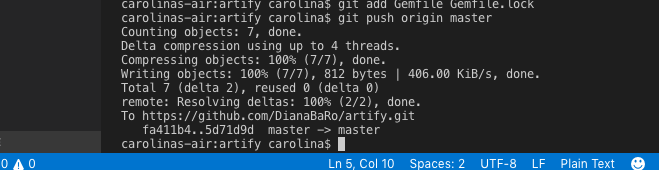
Done! I got my two new files in my repository.
Now, I want to install Nokogiri
Installing Nokogiri
I run in the VS code terminal $sudo gem install nokogiri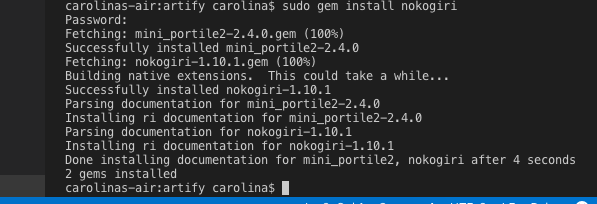
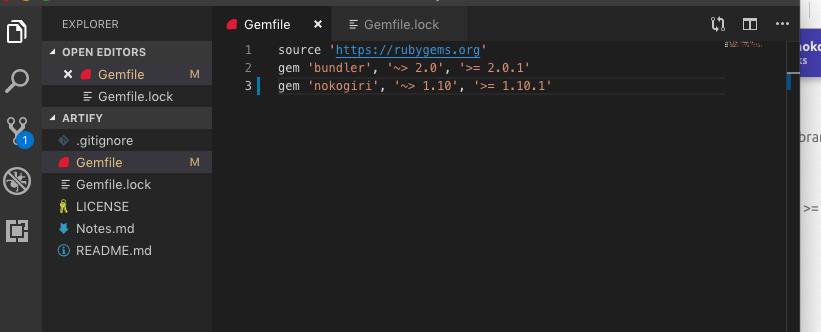
And after the installation was successfully I add my new gem to the Gemfile
I check if my changes are in Github and…no! They are not! Why? BecauseI forgot to push them.
My work flow in VSC:
Save changes – stage changes – commit changes – push changes
Installing pry
I run in the VS code terminal $sudo gem install pry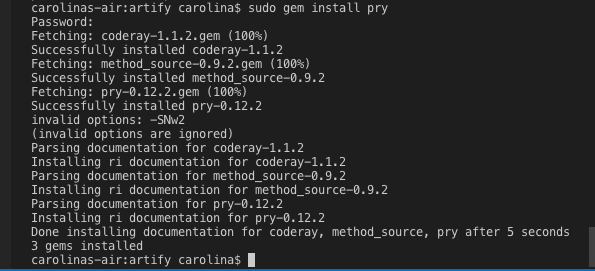
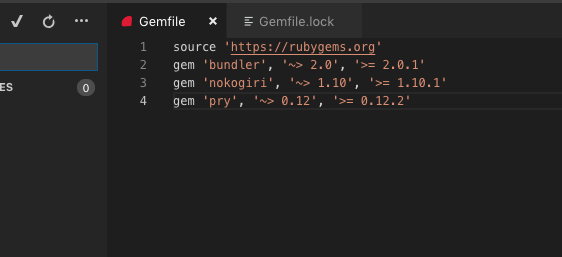
And then I add the new gem to the Gemfile
And I don’t forget about my VSC workflow! Save, stage, commit and push.
Installing ‘open-uri’
I was trying to install it and got this error:

I googled it and…
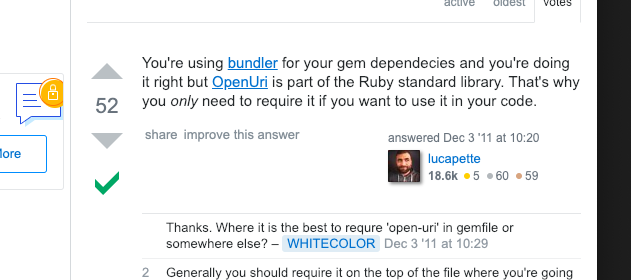
OpenUri is part of Ruby standard library, I just need to require it.
After all this installations I checked my Gemfile.lock and I couldn’t see anything about nokogiri or pry. I run $bundle install and my Gemfile.lock is updated.
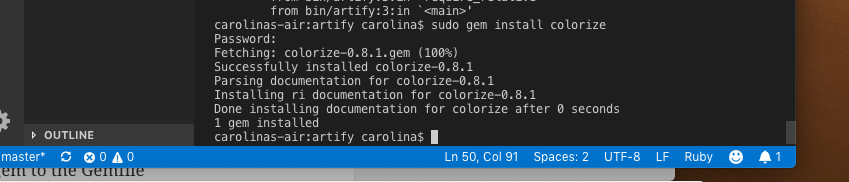
Installing ‘colorize’
I run in the VS code terminal $sudo gem install colorize
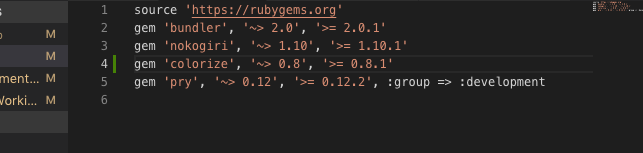
I add my new gem to the Gemfile.
And run $bundle install to update my Gemfile.lock.

I open my Gemfile and do this with my pry gem:
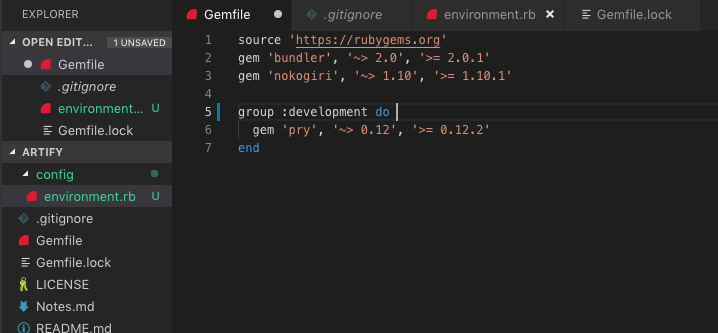
This is Group Syntax and I am specifying the environment where it is going to be used pry. I am going to change it for a shorter syntax, the hash syntax: gem ‘pry’, :group => :development
After installing all my gems I need to require them where I am going to use them.
config/environment.rb
Now, I create a folder config and a file environment.rb inside. In this file I will be loading, requiring, all of my app’s dependencies like my gems.

With this code all the gems that are inside Gemfile are required.
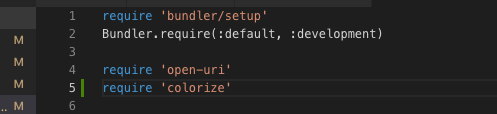
I need to require ‘open-uri’ and ‘colorize’ too in my environment.
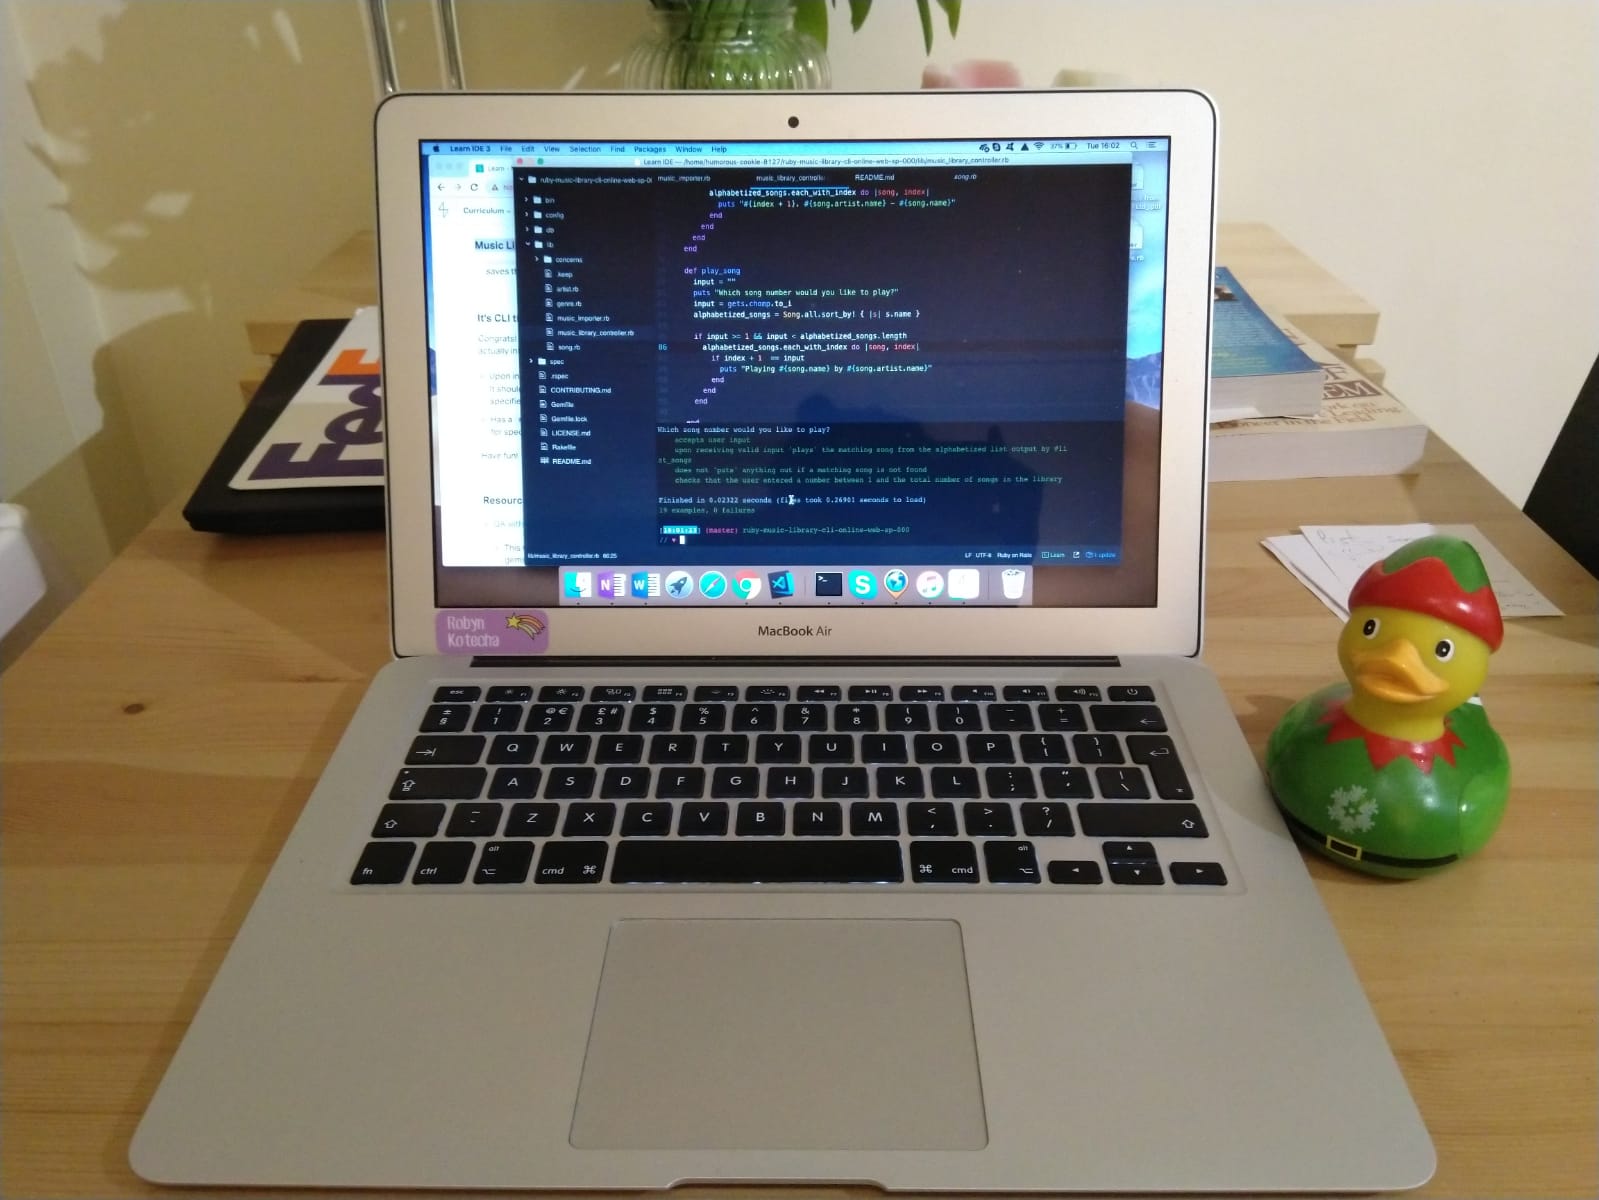
Rubber duck debugging
Last week I was working in the Music Library CLI Lab and I was not able to solve the last method I had to pass all the tests. I do not think it was more difficult than all the previous ones but even so I was not able to see what I was doing wrong. Maybe I was tired because I had been studying for several hours and I needed to clear my mind so I took a break. Talking to a friend about this situation, he told me why I did not try to explain my problem to a rubber duck.
Yap. I thought he was kidding but when I started working in my Lab I tried it and while I was explaining to the duck my problem I realised what was happening in 5 minutes!
Rubber duck debugging is a method of debugging code and a very effective one.
Here I leave a picture of my best study partner!