Category: Redux
Redux (on process)
Redux helps us to create a single source of truth, to group the state of our components in a JavaScript object separate from our containers or components. We can get and update the state we want connecting our component to this separate object. We wrap our component tree so we have access to Redux functions. We can grab the state we want and Redux will map it to our component as a prop.
We keep our state in the store. To update the data we have in the store we have to send an action, with a type and maybe a payload to the store, who send it to our reducer that holds information for how Redux can update that state depending on the type of the action. Actions and reducers are POJOS.
Any component ‘connected’ will be able to modify the state using an action we’ve defined.
We keep our state in one JS object, the store, and our actions and reducers on another two different JS objects.
Reducers will need a state and an action, and Actions will need a type property and an optional payload.
When we update the state it is very important not return null or undefined, that’s why we use a default return.
|
1 |
Action ({type: 'LIST_BOOKS'}) -> Reducer ( which is a function that we pass a state and an action (payload)) -> Updated State (returns as a prop to the component) |
Reducers are pure functions. Our reducer never updates the previous state, creates a new state object.
The reducer updates the state but doesn’t persist these changes. To persist these changes we can reassign the return value of the reducer to a variable. We can encapsulate that in a function, in dispatch.
We dispatch an action to the store, who calls our reducer and returns to us a new state.
We create a store function ( which is a closure) to encapsulate the state (so we don’t change it by mistake in other places of our code), to encapsulate our dispatch function and to encapsulate a function to get the new state (getState). When we call this store function we get an JS object with our dispatch function as a method, which has access to state.
Redux works by having an action dispatched, which calls a reducer, and then renders the view.
Using Redux in an React app
To install Redux in my app I type into my console:
npm install --save redux
npm install --save react-redux
npm install --save redux-thunk
- Initialize my store in
index.jsusing createStore Redux function and pass it down to my top-level<App />container.
|
1 2 3 4 5 6 7 8 9 10 11 12 13 14 15 16 17 18 19 20 21 22 23 24 25 26 |
import React from 'react'; import ReactDOM from 'react-dom'; import App from './containers/App'; import * as serviceWorker from './serviceWorker'; import { createStore } from 'redux'; import { Provider } from 'react-redux'; import booksReducer from './reducers/booksReducer'; const store = createStore( booksReducer, window.__REDUX_DEVTOOLS_EXTENSION__ && window.__REDUX_DEVTOOLS_EXTENSION__() ); ReactDOM.render( //We pass our store as a prop to Provider and wrap our App component so all our components will have access to our Redux store and/or dispatch actions via the connect function. //Provider tells to our Redux app when there has been a change in state and has to re renders via the connect function. We have to specify which changes to the store's state should prompt a re-render of the application. <Provider store={store}> <App /> </Provider>, document.getElementById('root') ); // If you want your app to work offline and load faster, you can change // unregister() to register() below. Note this comes with some pitfalls. // Learn more about service workers: https://bit.ly/CRA-PWA serviceWorker.unregister(); |
To have access to the store in any of our components we import the react-redux function connectinto the component where we want to have access.
If we want some state we can use:
|
1 2 3 4 5 |
const mapStateToProps = state => { return { whatEverWeWant: state.whatEverWeWant }; }; |
We can access these data as: this.props.whatEverWeWant. We can create our own customised props playing with the data of our store, with the state with have created in the state of our reducer. For example here we have whatEverWeWant only in the state, but if we want a prop like numberOfwhatEverWeWant we don’t modify our reducer, we can add numberOfwhatEverWeWant: state.whatEverWeWant.length in our mapStateToProps and that’s it!
If we want to dispatch an action and update our store we do something like:
|
1 2 3 4 5 |
const mapDispatchToProps = dispatch => { return { typeOfOurAction: () => dispatch({ type: 'TYPE_OF_OUR_ACTION' }) }; }; |
|
1 2 3 4 |
export default connect( mapStateToProps, mapDispatchToProps )(App); |
Then to be able to debug I have installed redux-devtools-extension and add this code to my index.js:
|
1 2 3 4 5 6 7 8 9 10 11 12 13 14 15 16 17 18 19 20 21 22 23 24 25 |
import React from 'react'; import ReactDOM from 'react-dom'; import App from './containers/App'; import * as serviceWorker from './serviceWorker'; import { createStore } from 'redux'; import { Provider } from 'react-redux'; import booksReducer from './reducers/booksReducer'; const store = createStore( booksReducer, window.__REDUX_DEVTOOLS_EXTENSION__ && window.__REDUX_DEVTOOLS_EXTENSION__() ); ReactDOM.render( //We pass our store as a prop to Provider and wrapp our App component so it will have access to our Redux store and/or dispatch actions from any component we want. <Provider store={store}> <App /> </Provider>, document.getElementById('root') ); // If you want your app to work offline and load faster, you can change // unregister() to register() below. Note this comes with some pitfalls. // Learn more about service workers: https://bit.ly/CRA-PWA serviceWorker.unregister(); |
connect function
|
1 |
export default connect(mapStateToProps)(App); |
connect function listen to changes in the state.
When a change occurs it calls the function mapStateToProps()where we specified the info we want from the state and gives it to us as a prop. We have to write this function ourselves. This function has access to the entire store’s state.
And then we finally specify which component of our app we are providing with this data.
If we don’t give a second argument to connect,(mapDispatchToProps would be the one), connect gives us the prop dispatch for free! This second method allows us to customise how we send actions to our reducer. If it is not for this second argument, our component wouldn’t know anything about Redux and our store.
One pattern is to only connect Container components.
Redux Actions
Actions are POJOs that has a property of type.
We dispatch our action to the store (whit the dispatch method), the store passes the action to the reducer, that checks the type property to see what he has to do, what changes will make to the state. Remember reducer takes two parameters, state and action.
|
1 |
store.dispatch( { type: 'LIST_BOOKS'} ); |
We should wrap our actions into functions, in case these actions have some parts that will need to change or add different payload properties (like a user to the list of user), and we pass those functions to the dispatch method. Those functions are called action creators.
We keep our React application separated from our Redux application by using the Provider component and the connect() function.
We don’t reference our store in our components. mapStateToProps() and mapDispatchToProps() allow us to separate concerns. The first one helps us to manage our state and the second one is an action creator, mapped as a prop. Our components only display state, they don’t manage it.
We pass these two functions to connect(). When connect()' executes it calls the first function, mapStateToProps, and pass it the current state. Then it calls the second function and passes it the dispatch function. The dispatch function takes an action, so don’t forget to import the action :). Then we can access this dispatch function as a prop.
Refactoring these methods.
|
1 2 3 4 5 6 7 8 9 10 11 12 13 14 15 16 17 18 19 20 21 22 23 24 25 26 27 28 29 30 31 32 33 34 35 36 37 |
import React, { Component } from 'react'; import './App.css'; import { connect } from 'react-redux'; import { addItem } from './actions/items'; class App extends Component { handleOnClick = event => { this.props.addItem() } render() { debugger return ( <div className="App"> <button onClick={this.handleOnClick}> Click </button> <p>{this.props.items.length}</p> </div> ); } }; const mapStateToProps = state => { return { items: state.items } } const mapDispatchToProps = dispatch => { return { addItem: () => { dispatch(addItem()) } } } export default connect(mapStateToProps, mapDispatchToProps)(App); |
This is equivalent to:
|
1 2 3 4 5 6 7 8 9 10 11 12 13 14 15 16 17 18 19 20 21 22 23 24 25 |
import React, { Component } from 'react'; import './App.css'; import { connect } from 'react-redux'; import { addItem } from './actions/items'; class App extends Component { handleOnClick = event => { this.props.addItem() } render() { debugger return ( <div className="App"> <button onClick={this.handleOnClick}> Click </button> <p>{this.props.items.length}</p> </div> ); } }; export default connect(state => ({ items: state.items }), { addItem })(App); |
We can pass an anonymous function as first argument to connect, and we can pass a function, if we do this we have to do it as before, or an object and connect will pass it the dispatch function. If we pass an object, this one needs to contain key/value pairs for each action creator we want to become props. As of JavaScript ES6, when we have an object with a key and value with the same name, we can use the shorthand syntax and write { addItem }.
combineReducers()
It combines the different reducers we pass to it into one single reducer that we pass to our store.
Boocket
Boocket is an app for book lovers that want to keep track of the books they want to read. You can search for books in the Google Book database and add them to your personal wishlist. If you can find anything you like you can create a new book and add it to your personal list and delete it when wished. All books are persisted in the Boocket database, so you will have always your list with you!
I used the create-react-app generator to start my project and in specific npx, a npm package runner, a tool to execute node.js packages.
npx create-react-app google-bookshelf
*I have change the name of the app after that.
My JS files, components and containers
index.js file will have my store with Redux that is connected with the rootReducer and thunk, in order to use async actions. index.js renders <Provider /> as the top level component and wrap my <App /> component.
App.js renders <NavBar />, <Footer /> and it is responsible for the React routes too using react-router-dom. I use react-router-dom, that is react-router plus some link improvements, <BrowserRouter> and <NavLink>.
<SearchableBookListContainer /> renders a form and takes care of its ‘query’ state. After the query, it renders a link list of books. This container is connected to the store to dispatch the action of searching and adding an item to the wishlist plus a list created after our search, the searchBookList. The list rendered with the results of the search has nested links to the book itself. Inside Link I pass a pathname and a state with the book object and in my representational Book component I will get this info as props from Link react-router. I can access them as props.location.state.
<WishListContainer /> is connected to the store and gets the wishlist from here and renders it. It dispatch two actions, getMyWishList that fetches my API end point for a list of books and the deleteBook action. The list of books rendered follows same pattern as the one displayed in <SearchableBookListContainer />, and includes links to the book itself.<CreateBook /> is a container connected to the store to dispatch the action of adding a new book and renders a form to create it.
<Book />, <Home />, <Footer /> and <NotFound /> components are representational components.<NavBar /> takes care of all links importing from react-router-dom NavLink.My source for the data is Google Books API. The Google Books API allows a maximum of 40 returned results and can sort only by search relevance and publish dates. I used the first functionality.
Using Redux and Thunk
Redux is a predictable state container for JavaScript applications. It helps you write applications that behave consistently, run in different environments (client, server, and native), and are easy to test. — https://redux.js.org/
I will use Redux to organize and have all my states in the same place and Thunk as a middleware to help me alter the behaviour of my actions, allowing me asynchronous requests. I will need to dispatch an action saying I am loading data, then to make a request to the API, and then to wait for the response and then dispatch another action with the response data.
With a plain basic Redux store, you can only do simple synchronous updates by dispatching an action. Middleware extend the store’s abilities, and let you write async logic that interacts with the store. — https://redux.js.org/
To install Redux and Thunk in my app I type into my console:
npm install --save redux
npm install --save react-redux
npm install --save redux-thunk
- Initialize my store in
index.jsusing createStore Redux function and pass it down to my top-level<App />container.
|
1 2 3 4 5 6 7 8 9 10 11 12 13 14 15 16 17 18 19 20 21 22 |
import React from 'react'; import ReactDOM from 'react-dom'; import App from './containers/App'; import * as serviceWorker from './serviceWorker'; import { createStore } from 'redux'; import { Provider } from 'react-redux'; import booksReducer from './reducers/booksReducer'; const store = createStore(booksReducer); ReactDOM.render( //We pass our store as a prop to Provider and wrap our App component so it will have access to our Redux store and/or dispatch actions from any component we want. <Provider store={store}> <App /> </Provider>, document.getElementById('root') ); // If you want your app to work offline and load faster, you can change // unregister() to register() below. Note this comes with some pitfalls. // Learn more about service workers: https://bit.ly/CRA-PWA serviceWorker.unregister(); |
To have access to the store in any of our components we import the react-redux function connectinto the component where we want to have access.
If we want some state we can use:
|
1 2 3 4 5 |
const mapStateToProps = state => { return { whatEverWeWant: state.whatEverWeWant }; }; |
We can access these data as: this.props.whatEverWeWant.
If we want to dispatch an action and update our store we do something like:
|
1 2 3 4 5 |
const mapDispatchToProps = dispatch => { return { typeOfOurAction: () => dispatch({ type: 'TYPE_OF_OUR_ACTION' }) }; }; |
|
1 2 3 4 |
export default connect( mapStateToProps, mapDispatchToProps )(App); |
Then to be able to debug I have installed redux-devtools-extension and add this code to my index.js:
|
1 2 3 4 5 6 7 8 9 10 11 12 13 14 15 16 17 18 19 20 21 22 23 24 25 |
import React from 'react'; import ReactDOM from 'react-dom'; import App from './containers/App'; import * as serviceWorker from './serviceWorker'; import { createStore } from 'redux'; import { Provider } from 'react-redux'; import booksReducer from './reducers/booksReducer'; const store = createStore( booksReducer, window.__REDUX_DEVTOOLS_EXTENSION__ && window.__REDUX_DEVTOOLS_EXTENSION__() ); ReactDOM.render( //We pass our store as a prop to Provider and wrapp our App component so it will have access to our Redux store and/or dispatch actions from any component we want. <Provider store={store}> <App /> </Provider>, document.getElementById('root') ); // If you want your app to work offline and load faster, you can change // unregister() to register() below. Note this comes with some pitfalls. // Learn more about service workers: https://bit.ly/CRA-PWA serviceWorker.unregister(); |
Considering web accessibility in my app
I have followed some requirements to take into account web accessibility.
- WAI-ARIA ( Web Accessibility Initiative – Accessible Rich Internet Applications). I am using Aria HTML attributes.
- Using as possible fragments <> </>to group together multiple elements and don’t break the HTML semantic.
- Every HTML form control, such as
<input>and<textarea>is labeled accessibly. - Create react app has the
eslint-plugin-jsx-a11yplugin with a subset of rules activated that checks your code as you develop.
Using docker
I wrapped up the project as a docker image in the Dockerfile.

Creating my API
I follow these instructions and as soon as I have the basics working I do the following:
Create a model for my Book:
|
1 |
rails generate model Book title:string author:text info:text |
I create a seeds file and run my migration:
|
1 2 3 |
rails db:migrate rails db:seed |
Generate my controller:
|
1 |
rails generate controller Book |
Create a serializer for book and draw my endpoint inside config/routes.rb
|
1 2 3 4 |
Rails.application.routes.draw do # For details on the DSL available within this file, see https://guides.rubyonrails.org/routing.html resources :books end |
How do I connect my react app with my rails API? In my actions. I fetch the end point of my API “books” and GET and POST to it.
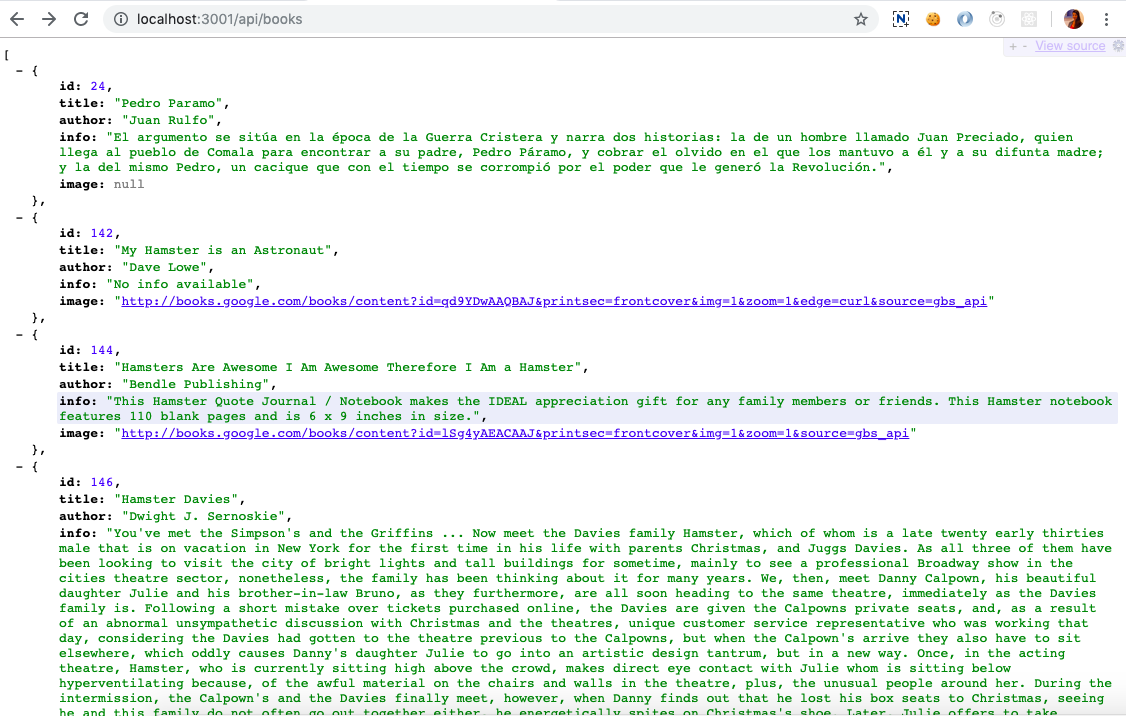
This is how my end point looks with my wishlist:
 And I think that that’s it! I have enjoyed a lot this project despite it took my a while to figure out Redux functionality. I went through a lot of different problems and learnt a lot. Ah, this bug was my favourite one . I manage to set
 undefined as my query so my search results were hilarious but very revealing too!